Hope you like the little song...It sounded good in my head! This Tutorial Tuesday I was quite productive. Gym, cleaning, and best of all CREATING!
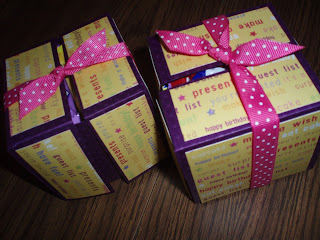
So, today we will be making these fun little cupcake boxes. Or gift boxes. Call them what you will. One thing they are absolutely....easy and cute! I made them for the guests who will be skating with us this weekend in Leicester for our bout against the Dolly Rockits (http://www.dollyrockitrollers.co.uk/)
So to start out, here is the ingredients:
1 piece of 12 x 8 3/4 card stock. (DSP is just not strong enough)
Sticky Strip (the wider the better)
Bone folder
DSP for (prettying up the outside) You will need two 2 3/4 x 2 3/4 and six 1 1/4 x 2 5/8
Snail (or adhesive of your choice)
Paper snips
Ribbon (enough to make a knot or bow, your choice!)
Score Pal or Fiskars paper trimmer (with swing attachment) with score slide installed. (Or you can use a bone folder if you lost your attachment like me)
So... Here goes. Funny how it works I couldn't find my directions, so of course, I had to deconstruct the box I made a while ago. I didn't take pics of that...it was a little too sad.
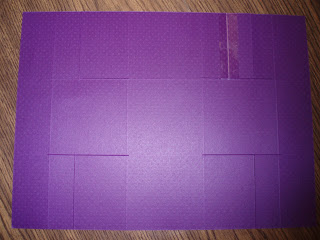
So take your CS that's cut down to 12" x 8 3/4, and lay it with the 12 inch side at the top. (Bear with me as I am not a professional photographer....)
Score at 1 1/2", 4 1/2", 7 1/2", and 10 1/2"
Flip paper so that 8 3/4" is now at the top
Score at 2 14/16 (I dont know my measurements so well.. but its 2 lines away form the 3")
Score at 5 14/16 (again, with the 2 lines before the 6")
Flip back to 12" side
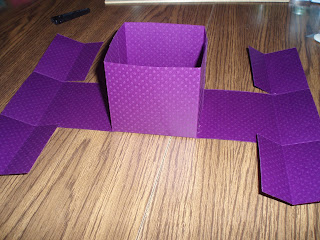
Use your trimmer or snips and cut in at 2 1/2 inches ONLY to the horizontal score line!! (NO FURTHER!) And again at 9 1/2" Repeat on other side
Now, cut on the horizontal score line that you cut up to. (these will be your little flaps for your sides. Do this on all 4 sections Don't mind my goof! I was watching the Today Show instead of my measurements...it's all good though. I used clear gift wrap tape and voila! All better!
Fold all score lines! YAY folding! (The least confusing part!) Isn't this exciting how its all coming together!
Now, we are going to snail the DSP onto our base. The two big squares will go on the big squares and the six little rectangles will go on the three spaces on both outsides on the right and left. You'll see. This was a pretty complicated way to explain. (Hmm, now I know why so many use videos for projects)
See, easier said than done! :)
Now to apply sticky strip. I used two pieces on each flap for extra stability.
The sticky strip will be applied on each of the little flaps (where you cut at 2 1/2) and on the big center flaps closest to you. (If you can see in the picture, on the center flaps I put them on the same side, they need to be opposite of eachother.) These will adhere the center square together.
Like so:
You will then adhere the small flap crease right along the edge of the squares laying flat.
Like so:
Now, fold these halves up and they become the sides.
Use your ribbon to hold these together and thats it! You've just made a purdy little cupcake (or treat or gift) box! How a bout that? Now get on out of here and get crafty! As always, if you have a comment, or maybe a better, less confusing way, please, please fill out a comment form!! :)
Until next time....have a spect-scrapular day!! (I just came up with that!!)
Subscribe to:
Post Comments (Atom)
-
Hey friends! Today I decided to mashup a few challenges and see what would happen. I chose the Retro Rubber and Watercooler Wednesday chal...
-
I just love when I can mash up challenges. Does it work for Friday Mashup as well as it does random challenge blogs? Usually not, lol! B...
-
Hey there! The other day I was determined to make a list of my for-sale stamps and get them posted somewhere . I was on a pretty good roll...


Great Tutorial! I love the colors that you used! Cant wait for your next post!
ReplyDeleteWhat a great box! Super cute shape and just in time for a few extra Valentine gifts. I'm following you now from SC...
ReplyDeleteCheck out my site when you get a chance...
stampingsolutions.blogspot.com
Great tutorial, I'll use it in the future. Thanks for sharing.
ReplyDeleteDebbie
I saw your blog on SC. I really like that box! TFS.
ReplyDeleteP.S. I'm your newest follower. yolanda-tryingtobecreative.blogspot.com
ReplyDeleteGreat tutorial, I will have to try it.
ReplyDeleteWhat a fun project....I think I will have to make one of these!
ReplyDeleteI;m your newest follower from the thread on SC. I invite you to stop by and follow me as well at http://rocpaperstamps.blogspot.com
Have a super day!
Patty